Installation Guide For Saunas
WOOD BURNING STOVES
For saunas using a wood burning stove we recommend using a 13amp (fitted with a 5 amp fuse) fused spur positioned to the rear of the sauna or up to 1M away with 5M of 1.5 3 core H07 flexible cable for us to run the lighting circuit from, the lights will only use around 30W.
ELECTRICAL HEATERS
HEATER CONNECTION WIRING NON WIFI HARVIA
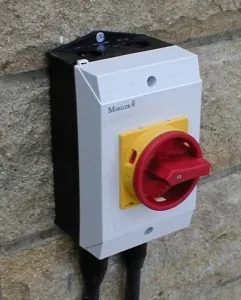
Your electrician is responsible for all the electrical connections required to get your sauna operational. We recommend a 32 amp supply for smaller 4.5-6.0 kw heaters and 40 amp supply for the larger 9 kw heaters. The supply must be protected by a 30ma residual current device (RCD) and also have a suitable type B MCB installed. An RCBO which combines both of these could also be used if required. If you are running the cable outside we recommend using a UV rated cable with protection from impact we usually see steel wired armoured cables installed, sizing will depend on the length of the cable run and which heater type you are using. A Rotary isolator with protection from water ingress (IP65-67) should be installed on the rear of the sauna or very close by. A 6mm 3core H07 flexible cable is the best option to come out of the isolator with and into the heater terminals. Any cable which has a larger cross sectional area, you will struggle to enter the heater gland and make the connections safely. We find the best time for the electrician to visit is after the sauna has been installed or if the site prohibits space wise on the same day as we build the sauna.
LIGHTING CONNECTION WIRING NON WIFI HARVIA
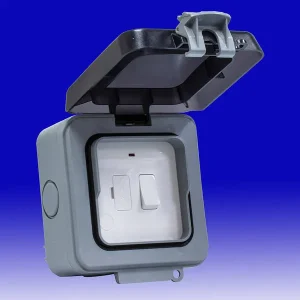
We recommend using a 5amp fused spur positioned to the rear of the sauna, you can use the same supply as your sauna heater and position this right next to isolator. Your electrician will need an adaptable box (size 190 x 145 x 70) to house the LED driver and kinetic switch connections this can be mounted on the rear of the sauna. The cube (160,210,250) saunas have a switch supplied by the manufacturer inside on the bench. Some conduit or trunking may also be used to contain the cables inside. Connections inside the wifi heater are tight so please try not use anything larger than 6mm cable for the supply.
HEATER / LIGHTING CONNECTION WITH HARVIA WIFI
The above NON wifi sections still applies but the electrician will need to run the lighting feed from the heater terminal as the control pad switches the lights on and off (cube saunas the switch on the bench should be left on). The door sensor switch should not be installed and should be shorted out on the mother board with the provided spade connectors supplied by Harvia and a piece of small cable 1.0mm will do. The control pad cable will need to be ran and installed where the customer would like it. We will install the temperature sensor cable ready for the electrician to clip it back to the heater terminals.
COMPLIANCE
Your electrician must provide an electrical installation certificate and notify local building control of the works carried out.
Any installations we see on installation that does not have valid electrical test certification may not be connected if we deem the installation unsafe.
The advice we give regarding electrical requirements is always given as advice and you should in every occasion consult an electrician to ensureregulations are complied with.
SAUNA BASES REQUIREMENTS
Base sizes are guidance only and you can make them bigger if you wish
DEPTH = Front to back WIDTH = left to right
Embawood 125 cube – Width 1600mm x Depth 1400mm *Total weight 450kg
Embawood Cubis 300 XL – Width 2500mm x 2400mm *Total approximate weight 1000kg
Embawood Barrel 160- Width 1600mm x Depth 1600mm *Total approximate weight 500kg
Embawood Barrel 280 – Width 1800mm x Depth 2800mm *Total approximate weight 1000kg
Embawood Barrel 400 – Width 1800mm x Depth 4000mm *Total approximate weight 1300kg
Embawood Tampere L – Width 2300mm x Depth 2300mm +Total approximate weight 700kg
Embawood Tampere S – Width 1500mm x Depth 2100mm *Total approximate weight 600kg
Cube/barrel 160 – Width 2000mm x Depth 1600mm *Total weight 800kg*
Cube/barrel 210 – Width 2000mm x Depth 2100mm. *Total weight 800kg -900kg*
Cube/barrel 250- Width 2000mm x Depth 2500mm. *Total weight 900kg – 1000kg*
*weights are calculated before bathers are inside*
You can place your new sauna on an existing base of decking or paving but usually this is designed and built with fall to run water off so will result in your sauna not being level when we install it. Packers can be used to prop up the sauna but we can only use the wood its made from to do this. We recommend a purpose built solid concrete base 100-150mm thick which is screeded level with minimal fall / run off for surface water. The more level the surface the better for your new sauna.
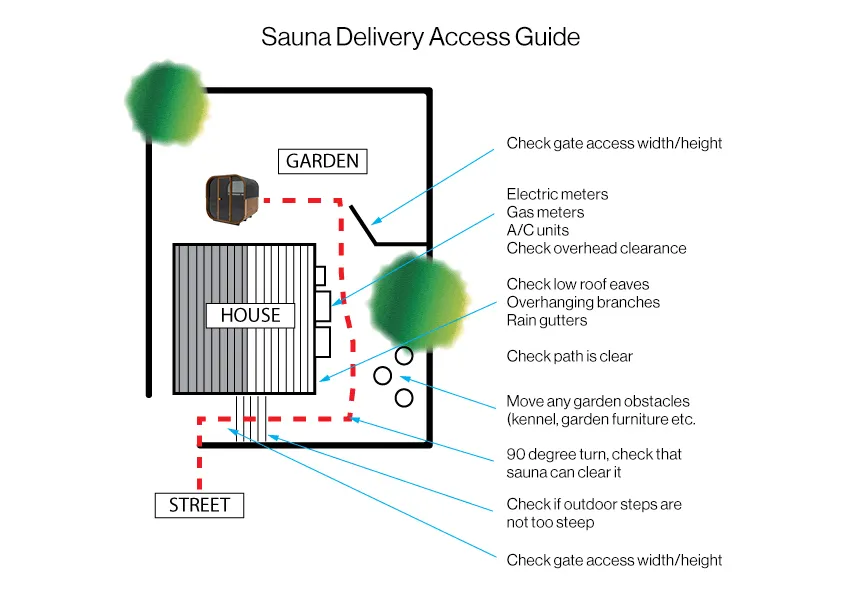
ACCESS
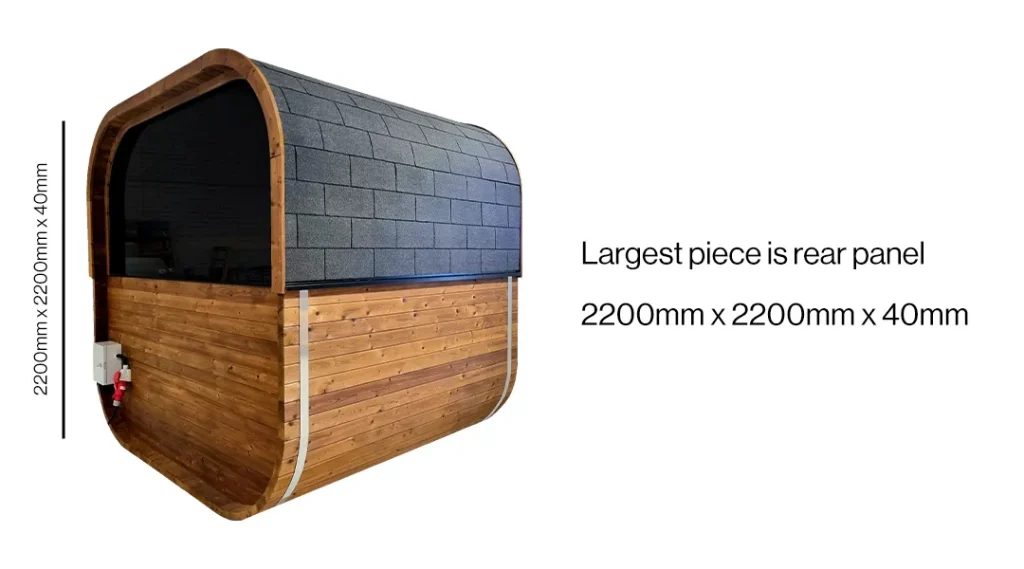
Better Living Outdoors saunas come delivered in various sized pieces. Dimensions shown are the minimum access requirements to deliver and install your sauna at the location of your choice. If steps are included on the route to your chosen location please show us via WhatsApp.
SAUNA WOOD TREATMENT
EXTERNAL WOOD TREATMENT
We recommend using a wood preservative treatment to help reduce wood rot and decay barrentine offer a really good option for this in either clear or in some different shade options, the coloured options do have a UV protection mixed in with them, but if you don’t want to add a colour and would like the natural wood look use the clear barrentine preservative and use OSMO UV satin wood oil as a top layer aiding the woods natural colour and tone for many years to come. This gives a double layer of protection, we recommend you preserve and oil the whole of the sauna externally. You should reapply this every 12 months.
Without any wood treatment as the Thermowood ages it will go a silver shade and age a lot faster.
INTERNAL WOOD TREATMENT
The whole of the inside of your sauna including the benches should be treated with Paraffin oil which is an odourless oil safe to use inside saunas. This will help aid the ageing of the wood and its resistance to moisture. You should reapply this every 12 months
Find The Right Spa And We’ll Install It For Free
We deliver, position and show you how to use your spa - meaning you can enjoy your spa without the hassle

Shrewsbury
Explore our Shrewsbury showroom to discover our complete selection of hot tubs, saunas, and chill tubs.
Durham
Explore our Durham showroom to discover our complete selection of hot tubs, saunas, and chill tubs.
Shrewsbury
Explore our Shrewsbury showroom to discover our complete selection of hot tubs, saunas, and chill tubs.
Durham
Explore our Durham showroom to discover our complete selection of hot tubs, saunas, and chill tubs.